Charity painting in memory of 22 year old Abi

I have painted a carefree portrait of three ducklings for charity, in memory of my friend, Abi French.

Puddle Ducklings

Puddle Ducklings

Leicester born and raised, Abi French (née Edwards) passed away in February 2015, just days after her 22nd birthday, from a sudden blood clot. The entire sale price of the painting will be donated to Glenfield Hospital’s Blood Clot Prevention Unit – in recognition of the care they had given Abi over the last four years.

“I painted Puddle Ducklings just because I really needed to do something positive and proactive to take away from the horrible unfairness of it all. Abi was the first friend I made when we both moved to RAF Marham with our partners. She was a rock for me while they were on deployment last year, and I will never forget her.” 

Ferrers Gallery in Ashby de la Zouch will be exhibiting and managing the sale of ‘Puddle Ducklings’, which goes on display on Saturday 25th April. They will also be selling a series of fine art prints of the ducklings, with all of the profits going to Glenfield Hospital.

The exhibition will run to the 5 July 2015, with the painting being sold by an open bidding process.

“Ferrers Gallery is delighted to be able to help Imi Woods raise money for Glenfield hospital. The painting of the ducklings will be on display at the gallery and mounted prints will be for sale also, with all profits going to the cause.”
Rachael Chambers – Ferrers Gallery

If you are interested in bidding on the painting or a print, pop into Ferrers Gallery to see the exhibition.

Thank you so much for everyone’s support so far. Let’s raise as much money as possible to stop this from happening to someone else.

What is the best thing about your job?

For years, the best thing was the look on people’s faces when I handed over a painting. I get giddy on their shining eyes and compliments, thrilled that something I pour so much time and love into can bring them so much happiness.

But now I am not sure!

Last Spring, I had a stall at my local Village Fayre. I was there painting a Little Owl and selling my collection of cards, paintings and prints, when a lady asked me an interesting question.

“Would you ever try teaching?”

She said, referring to her nine year old daughter.

I was caught off guard. I had never even thought of teaching.

Being self-taught, I had no idea where I would begin. I don’t seem to create my paintings in a logical order – I flit from section to section, depending on what I fancy, or what paint I have on my brush.

We swapped details and I mulled it over for a few days. Why not?! I thought. It would be fun!

We agreed to start a series of six lessons in August. My boyfriend was being deployed, so it would be the perfect project to keep me busy and creative. Sophie (the nine year old) also seemed giddy with excitement.

Lesson 1

I went along, armed with a small box canvas, a bulging bag of paints and brushes, a ruler, a pencil and a gridded up photograph of a bunny. Not wanting to start off the lessons on a boring note, I explained to her that this step was by far the most important part of a realistic painting.

Under my lead, she gridded up the canvas into five centremetre squares, and into each one, copied exactly what she saw in each square on the photograph. I taught her to really look at the photograph, and appreciate all the sections of shadow, light and contrasting colours, and mark them all onto the canvas. I promised that next week we could get our hands painty.

Sophie 1

Lesson 2

We decided to do a green background full of vegetation. She was a bit timid at first, but with my encouragement, she started to mix colours and hesitantly dab them onto the canvas. I explained that the beauty of acrylic paint is that 1. If you made a mistake, you could paint over it and 2. That it was waterproof, so you could wipe off fresh layers of paint if they weren’t quite right.

“Woahhh I love acrylic paint!”

She said.

Lesson 3

I outlined the importance of getting down base layers of paint on the bunny.

“If you can see through it, you need more paint.”

Is my general rule of thumb. Together, we really looked at the photograph, and with my help, she was able to see subtle colours that you wouldn’t ever notice before.

“I think I can see some purple in there.”

I said, pointing at the bunny’s pouchy cheeks. She mixed and dabbed colours, using different techniques and different brush sizes as required. I couldn’t stop myself from getting stuck in, subconsciously mixing colours, and applying paint to brushes, before catching myself and handing them onto her.

Her confidence slowly grew as she spotted all the reds, purples and browns scattered throughout the bunny’s fur. I urged her to mix in subtle amounts of white paint, to which she asked :

“What does that do?”

“Think of it like putting cream into a tomato sauce.”

I said

“It makes it thicker, richer and paler.”

Sophie 3

Lesson 4

This week, we were ready to get started on the bunny’s face.

“III’m SOOOO EXCIIITEDDD!”

She said.

Together, we practiced painting eyes on a separate piece of paper. I showed her how to make them look 3D and alive, with a glint of light in them. We also practiced creating thin hairs with a little fine brush. After a few tries, she felt confident enough to have a go on the canvas. The result really started to bring the bunny to life.

Sophie 4

Lesson 5

This week, we painted in the nose, mouth, and continued making the bunny fluffier, using different shades of colour applied in short sharp movements with a little fine brush.

“I can’t waiiiiitttt for it to be finished!”

She said, anxious to take it into school and show off her work to her friends and teachers.

Sophie 5

Lesson 6

We had such a productive lesson, and really got into the swing of getting our hands dirty for the sake of art. I noticed with joy how much more confident my student, and how much more control she had over a brush after only six hours of tutoring.

She asked me how I made colours blend perfectly into each other in my paintings, and I admitted that the majority of the time, I use my hands! So that lesson, we did the same.

Sophie 6

Lesson 7

In the final lesson, we practiced creating very thin lines using acrylic ink, so that we could create realistic whiskers.

“Ooooh I’m scaaareeed!”

She said, unwilling to potentially ruin her precious artwork.

I reminded her that acrylic paint is waterproof, and if she got it wrong, she could wipe it straight off!

By the end of the lesson, she had marked on (and wiped off) dozens of whiskers, and painted on some grass around the bunny’s feet.

I was overcome with pride at the finished result, at Sophie’s reaction, at her mum’s reaction!

“I cant tell you how much she has enjoyed these lessons. This has got to be the most rewarding thing she has ever done!”

Her mum said to me.

I can’t wait to do some more teaching! It feels so good to share my skills with others!

Sophie 7

While the man’s away, the girl can paint!

I am now about three quarters of the way through my boyfriend’s deployment (touch wood)! Rather than spending my days clock-watching, I have been filled with motivation to paint, plan and socialise!

So what have I been up to these last few months… apart from working full time five days a week?

ART

Exhibitions: First and most importantly, I exhibited in the prestigious Marwell International Wildlife Art Society Exhibition! This is the largest wildlife art society in Europe, founded and organised by Pip McGarry. I was at the exhibition all weekend – with a stall on Saturday 30th August and as a steward on Sunday 31st.

Beauty WM

It was a really enjoyable experience, although it made me realise that I am a relatively little fish in a big old pond.

The plus?

I am a young little fish with plenty of time and enthusiasm to grow into a whale (or at least a tuna)!

Tutoring: Each week, I have been art tutoring a talented and enthusiastic nine year old girl. I talk and demonstrate her through the steps to create a beautiful and proportional painting of a bunny. Doing this makes me feel incredibly warm and fuzzy and has made me realise that I love teaching (people who are patient and enthusiastic about art).

1655987_10152714632787095_6119319155349318375_n

Workshop: Tutoring has motivated me to organise my first ever painting workshop!

On the 28th and 29th October (half term), I am delivering a two-day ‘Learn to Paint your Pet’ workshop at Framin’ Art in Downham Market for 12 – 18 year olds!

The workshop will be kept to a small group, and we will cover everything the students need to create a masterpiece:
• gridding up and drawing out the canvas
• painting soft-focus backgrounds
• mixing colours
• painting eyes and noses
• painting long and short hair
• painting shadow and light
• finishing touches

Places are still available – please email me if you would be interested in attending!

aaworkshop

Paintings: I have completed three paintings and am about to start on a Christmas commission.

Hob-nobbing: I went to fellow Wildlife Artist, Lauren Dobson’s, private opening of her exhibition at the David Shepherd Wildlife Art Gallery in Guildford. I met Lauren, got inspired to try out different techniques, and had an interesting chat with the gallery owner.

SOCIAL

I tell you, there is nothing like living on your own to give you a kick to socialise.

Hostess: I have already had five of my friends / family come to stay with me in Norfolk for weekends. This has meant I have got good at whipping up food for a dinner party, and has spurred me to explore my local area – finding the lovely Wells Next the Sea, taking advantage of the rail line to Cambridge, and seeing wildlife at a nearby Bird Sanctuary!

aawells

Home time: I have spent a lot of time at my family home in Surrey, seeing my ‘home’ friends, having dinner dates, going to the Harry Potter Studio Tour, spending a weekend in Portsmouth with my sister, and going to a wedding! I am incredibly fortunate in that I can work from Norfolk or Head Office in Surrey, which means I can stay for longer than just a weekend.

aaharry potter

New friends: I have finally been making friends in Norfolk. God bless the WAGs! Having friends in the same boat makes this weird experience much funnier.

aawags

WHAT’S NEXT?

My diary is still chock a block, and so is my to-do list (with tidying the house and gardening taking a real back burner).

Paintings: I have a lot of painting to do! This includes:
• Christmas commissions – two booked, more expected.
• A couple of paintings for the David Shepherd Wildlife Artist of the Year Award – deadline February.

Marketing: I need to continue marketing my art workshop, buy all materials, prepare my canvases for demonstration… oh and deliver it!

Old friends: I have plans to see a friend from university in London, have a girly weekend with my three best friends before two of them go to South Korea and Spain for the foreseeable, and go for a nice dinner out with work friends.

Tutoring: I also have some more art tutoring to do! The bunny isn’t finished yet!

All I can say is BRING ON THE NEXT FEW WEEKS!
And then I can collapse in an exhausted heap and hibernate with my Jack.

Developments of a moonlighting artist

Day jobs and running a (however small) mothership are time consuming, aren’t they? How anyone has time for updating the world on their slowly developing painty plans is beyond me.

Excuses out of the way, let’s get down to the real news, a round up of all that has been and will soon be happening in the world Art by Imi.

David Shepherd Wildlife Artist of the Year

Back in December, I entered my kookaburra, Herman, into this prestigious competition – which sees the shortlisted paintings hanging at the Mall Galleries in London… right now. This week! GO SEE IT!

I just missed out on being hung, but a copy of my painting is being displayed in a folder at the exhibition (Selected not hung), and is also up for sale on their website.

The famous bird

The famous bird

Due to the curse of the surname, Woods, you will need to scroll right down to the bottom of this folder to see my painting! (Alternatively, it could be a benefit – the last one you see will stay fresh in the mind?)

It gives me lots of confidence that maybe next time, I might just get hung!

Rowledge Village Fayre

A rainy affair to say the least. Wrapped up in my ski jacket in late May, I spent the day painting Tomtom, an owl with a hella lot of attitude for someone only 20cm tall.

We met Tomtom (original name forgotten) at a Country Fair in Norwich, and I fell for him. Snuggling into the shoulder of his adoptive mother, he glared at us as we angled a camera in his direction, and we took some moody yet adorable photographs.

I got to hold a hawk, and we stumbled across concepts that I didn’t even know existed… like the Norfolk Goat Club.

DSC_2602

The girl loves birds

But anyway, back to Rowledge Village Fayre. Despite the weather, Rowledge residents were out in force, and I got snapped painting by photographers from the Farnham Herald and the Ash & Farnham News and Mail.

imiatrowledge

spot the difference

I met many dogs, and may have lined up some commissions for the coming months.

My new selection of cards also proved popular – please contact me if you want a pack.

cards

Zebs in every colour

Art tutoring

At the fayre, I met a mother of a nine year old girl, who asked me if I would consider art tutoring to me. When I was nine, I started having flute lessons. Breaking away from the norm, she will have ‘how to paint a bunny’ lessons.

After pinging a few emails back and forth, it is planned that I will teach my young apprentice in a series of six private lessons beginning in August.

Starting with marking up a canvas, I will cover subjects such as:

  • mixing acrylic colours
  • painting colour washes
  • building up detail through multiple layers
  • creating texture by getting creative with tools
  • painting eyes, hair, fur and feathers
  • using acrylic inks.

Having never been taught in animal portraiture myself, I think it will get me to ask myself why I do things how I do them, and consider ways of improving my own methods.

It will also (hopefully) get my apprentice enthusiastic about art, and enable me to influence her from a young age to ALWAYS PAINT THE SIDES OF THE CANVAS!

It is an exciting new project for me, and I hope it will open up doors to further teaching opportunities.

Doing that painting thing

Ah yes. Painting. I have been doing some of that too. Not as much as I would like, but some. Problem is, as soon as I get it out, the whole house looks like a bomb has hit it.

Cue whining to Jack: “pleaassee can we buy a house where I can have my own art studio?!”

oh I wish

I am currently painting a kingfisher (yes, another one). I am really enjoying it, it’s a fun project! Mixes of turquoise, phthalo green, and purple to create those distinctive teal feathers, and flashes of orange and gold for the glinting chest.
Marwell International Wildlife Art Society (MIWAS) Annual Exhibition
My new kingfisher is being painted for display in the Marwell International Wildlife Art Society (MIWAS) Annual Exhibition this year.

It’s at Rookesbury Manor in Wickham (which is half way between Portsmouth and Southampton) from the 29th – 31st August.

officially a member

I am giddy with excitement about it, and about the opportunity to be up there hanging with the big dogs of the wildlife art world (the pun was too good not to throw it in).

On Saturday 30th August, I will have a stall at the adjoining art market, where I will be demonstrating my art and selling my work, while on Sunday 31st, I will be acting as a guide at the event, greeting visitors and showing them round the exhibition.

For the amazing calibre of art you will see, I urge you to put the date in your diary and visit this exhibition. I was awestruck last year at the detail and beauty of the work, and how down to earth the artists were.

It’s not all black and white

When I was 15, I painted a huge monotone red landscape of the Cornwall coast. My art teacher suggested putting green, purple and blue into it. I looked at her as though she was mad!

“Err. Miss, it’s a REDSCALE landscape. As in: only red allowed.”

 But when does red stop being red and start being orange?

 When you print in greyscale, that’s it. The only colours present are white, black, blacker white and whiter black.

 When you paint in greyscale… that’s not it. And I understand that now.

*******************************************************************************************

To paint a Zebra… you will need:

  •  White and Black paint, yes.
  • But also: copper, purple, blue – but a cobolt blue, not a turquoise blue, brown – a raw umber and a burnt sienna, green – something yellowy like hookers green, burgundy, gold and yellow. And fancy ones like flesh tint. And it wouldn’t hurt adding in a lot lot more either!
  • A canvas, I used 50cm x 50cm.
  • Water
  • Flat paintbrush & small rounded paintbrushes of varying size.

 How to guide

  1. Lay down the basics: Grid up your photo and your canvas.I have a grid that I use digitally on my computer screen to put over the photograph.

    I then use each square on the screen as a 5cm square on my canvas. Then you just copy what is in each square onto your canvas in pencil. It keeps all stripes accounted for.

    Paint the background white. This may take several layers.
    IMAG1656

  2. It is just black and white: Paint the black stripes in black, and the white stripes in a pale grey (I won’t tell anyone if you just use white paint with a little bit of black in it. That’s what I did for the base coat!).The trick at this stage is just to make it so that every part of the canvas is covered:

    Trick: hold it up to the light and see if you can see through it.
    IMAG1665

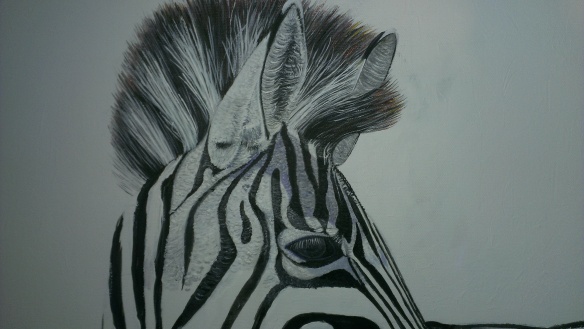
  3.  Cruella-style Mohawk: Use a flat brush to paint the white areas in grey, and the black areas black. Then use a small rounded brush to add individual pale hairs into themane. I find that using acrylic inks can really help get precise brushstrokes.Mix a bit of cobalt blue into your grey, to get cooler tones, and hints of yellow, brown and copper to get richer tones.

    I also used flecks of pure copper at the tips of some of the hairs, which gives the impression that they are caught in sunlight.
    IMAG1668

  4.  Hairy ears and eyelashes: For the ears, you need a reallydiddy brush, definitely mixing in some blue and a hint of green to get cooler tones.The trick is lots of tiny short brushstrokes on the outside of the ears to get a look of fur, not hair, and then warmer shades of longer, curly strokes inside the ears.

    For the eyes, paint the area a deep blue-grey, and then put in a darker pupil. Use white acrylic ink to flick delicate eyelashes from the top eyelid.
    IMAG1674

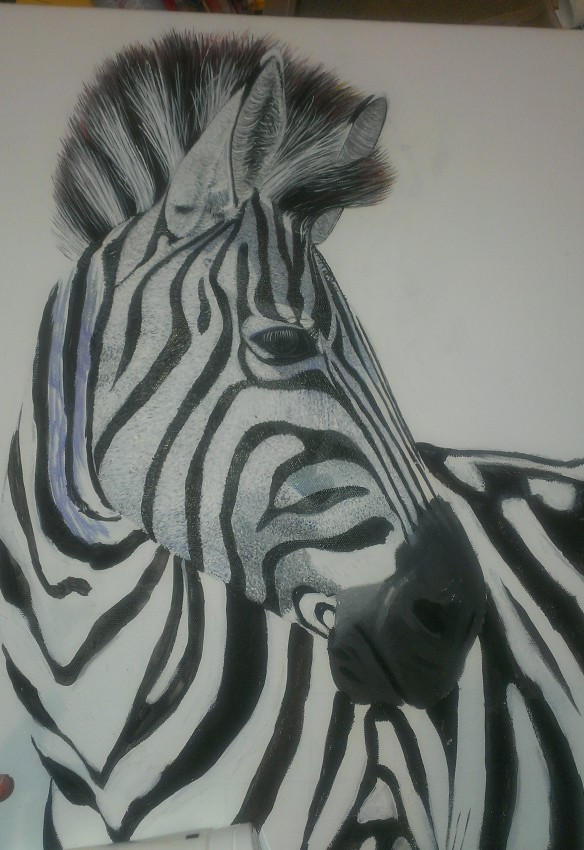
  5.  The White Stripes: Pay particular attention to the different tones in the photograph.Once you get past the idea that the ‘white’ stripes should be paler than the ‘black’ areas, and start seeing them as just tones, you will go forward in leaps and bounds!

    Use a range of varying watered down grey-blues using a little rounded brush, and create little delicate hairs.

    Sculpt areas of shadow and light so that you can make out the muscles of the body.
    IMAG1678

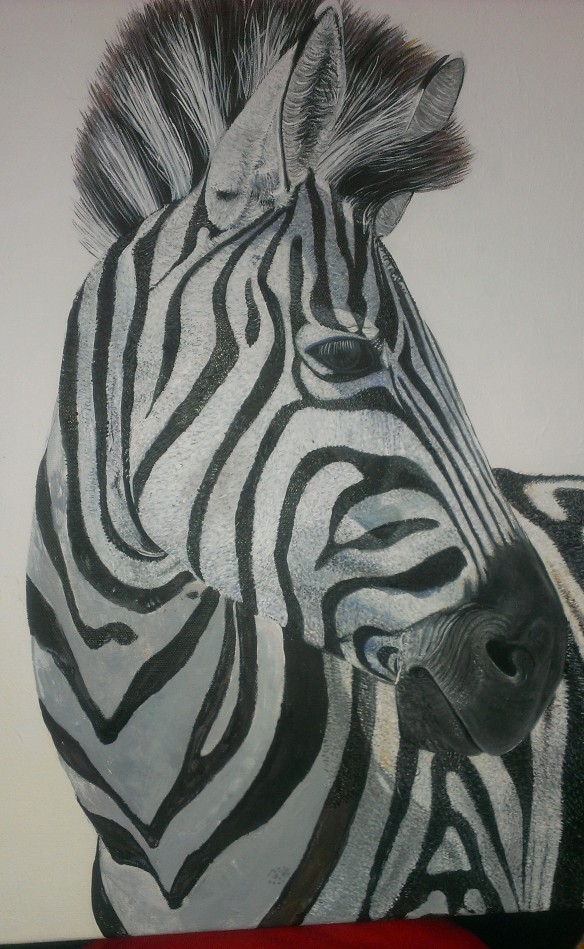
  6. Crinkly snout: This was the part that I found the toughest. No hair! Firstly block in the different tones of shadow, mixing green into your paint to achieve an accurate shade. Then pick out the areas of highlight with a pale grey.

    Use short brushstrokes to carve dots and crinkles into the skin to give the impression of wrinkles and pores. IMAG1696

  7.  Plug away: There is no secret to achieving detail. Just lots and lots of layers of little hairs, covering all of the stripes, all over the body.A lot of hours of your life… As soon as one stripe is done, onto the next!
    Zeb - Imi Woods

I am thinking of getting giclée prints made of Zeb.
Please let me know if you would be interested in pre-ordering.


How to paint a barn owl

Meet a barn owl: I went to the Andover Hawk Conservancy and met little Echo. Ideally, I would have liked to keep him, but at least I got to take away some amazing photographs!

DSC_1450

Grid up your canvas: On this 20 by 20cm canvas, I went for squares of 5cm each, making sure that my photograph was also gridded up with the same dimensions. Then it’s a simple case of putting the basic shapes from the photograph into the same place on the canvas. Some artists may scorn at this approach, but to me it is just planning for success and avoids abortive work later on.

barn owl

Paint the background: For this painting I went for a simple matte violet (violet paint with a hint of white for extra creaminess.)

IMAG1545

Paint the face base coat: I find where you have white fur or feathers, paint a base of a purpley grey, and then use white over the top to add final detail.

IMAG1546

Rim the eyes: use long curled brushstrokes fanning out from around the eyes to create that characteristic heart shaped face.

Eye eye: paint the eyes as squashed circles, with a dark black surround and pupil, and a paler iris. Then put paler grey sheens where the light catches, and white glints.

Paint the beak: I used a pale pink, with a paler stripe down the middle. This then disappears into a darker tip, the same colour as the two (for want of a better word) nostrils. Then use white paint to flick little feathers over the top of the beak.

Body base coat: Start with a base of a slightly darker tan colour, using a mix of sienna, gold and white. Following this, add more white and gold and create areas of highlight and detail.

IMAG1565

Shades of grey: Barn owls have beautiful speckles of grey on their back and upper body. Refer to your photograph and use a mix of black, white and a hint of purple to give the grey an added dimension.

IMAG1566

Speckles on the speckles: I then cross hatched over the grey speckles using a darker grey and a lighter grey watery mix and a teeny tiny paintbrush.

IMAG1568

Finishing touches: Then I put on small black freckles with white tails. Check the photo if you don’t believe me! Bird’s feathers are so detailed and surprising when you look at them up close

Echo ARTbyIMI

The Four Commissions of Christmas

On the first day of Christmas, commissioned to me, Lyra the dog for a lady named Dee.
I painted the piece mainly at a fair, many were captured and stopped to stare.
This painting was one I enjoyed the most, I missed it when it went in the post.

Lyra artbyimi

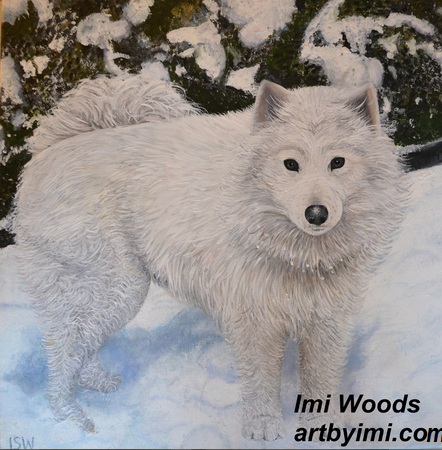
On the second piece, pressure began to show. It was a Samoyed surrounded by snow.
With one shade of paint I couldn’t be tight. Yes you have guessed, it was the white.
With purple shadows for snow and cream for the body, the outcome wasn’t too shoddy.

Zola artbyimi

The third commission I was stumped to begin. It was no animal, but a mandolin.
A mirrored surface and fiddly strings, I used best handwriting to write “Recording Kings”.
I painted a throw on which it sat, could have stitched it in the time it took to paint that!

Andrews Mandolin

Commission four was a kitten that lives on a boat, with wide green eyes and a tabby coat.
The painting began at my Christmas stand, surrounded by punters, paintbrush in hand.
Thin stripes of whiskers were the finishing touch, the end result I liked very much.Capi artbyimi

Merry Christmas everyone, enjoy your day, I hope Santa Claus has visited with his sleigh.
I’ve had lunch and games with my mum, dad and sister, now out for presents with the Mr.
My books are open in the new year. Commission some art for some cold weather cheer!

Art framing for Dummies

You are cordially invited to attend my PREMIER ART EXHIBITION!

Where: Frensham Studios, Farnham, Surrey, GU10 3BJ.
When: Saturday 7th December – Sunday 15th December

If you are in the area, please come down and see me and the other exhibiting artists.

Do your Christmas shopping there, because art truly makes an amazing present!
It’s thoughtful, it keeps on giving, and it won’t lose its value. It will even increase! 

***********************************************************************

To prepare for the exhibition, I have got several of my paintings made into prints, including a limited edition run of my Kookaburra.
I have framed all of these to make beautiful ready-to-hang gifts.

I’m sure you know, framing art can be incredibly expensive. It’s normally out of reach to the young artist starting out. But following some excellent advice, I have done it myself.

Same professional finish, but more affordable for me… meaning more affordable for you!

Here’s how you can frame your artwork too:

You will need:

  • Giclée prints on cotton rag paper of your artwork.
  • Black illustration pen
  • Black wooden frames of the same size as your print.
  • Gum tape
  • Scissors
  • Personalised stickers
  • Water
  • Clean cloth
  • Patience…

1: Sign and name your artwork using your black illustration pen

IMAG1500

2. Get a smart black wooden frame. Standard sizes are much more affordable than bespoke sizes.

IMAG1501 (1)

3. Pop your print in, and put a plain piece of paper behind it to protect it from the frame.
Put the back of the frame on.

4. Get your gum tape and cut strips of the right length to cover the seams on the back.

IMAG1508(1)

5. Using a cloth and water, dampen the shiny side of the gum tape (like an envelope)

6. Carefully paste the sticky strip along the seams on the back of your frame. This will keep all the dust out, keeping the print safe and secure.

IMAG1506

7. Do this for all the other sides. You may have to cut into the gum strip to avoid pasting over wall fastenings.

IMAG1503

8. Pop one of your personalised stickers in the corner.

IMAG1502

Now your artwork looks fancy and framed, but you and your clients don’t need to shell out the big bucks!

IMAG1488

Don’t forget about the exhibition – It would really make all of my hard work worthwhile to see you there 🙂

Make your painting SHINE!

…by investing in some Acrylic Ink!

I am a true convert to this lovely liquid and am struggling to understand how I achieved so much detail in my paintings without it.

The benefits are:

  • They are much thinner than acrylic paint, but with the same depth of colour. This means they can be used to create thinner lines – like hairs and feathers!
  • They can be controlled far more than acrylic paint.
  • They are completely waterproof when dry – so all the benefits of acrylic paint come out here.
  • They give a slight sheen when dry, giving the canvas a different dimension. They are especially effective on beady eyes.
  • They are good value!
  • You can control easily how much you drop on your palette – less wastage than regular acrylic paints.

All you need is a teeny paintbrush, and a mutlipack of inks!

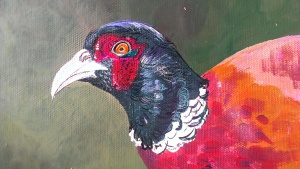
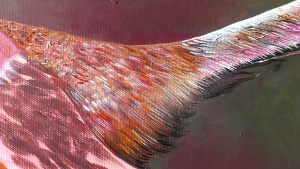
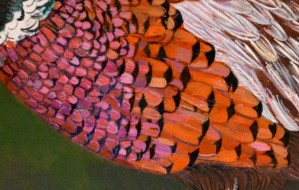
The Pheasants

IMAG1444

Ink can be used to create minute detail such as feathers on birds’ faces.

IMAG1445

Shake your tail feathers  – blend lots of colours to create depth and volume of metallic feathers.

IMAG1454

You can create detailed ranges of feathers with lots of different colours.

DSC_2097 (2)

You can get inks in metallic colours to really get a shine on.

DSC_2098

Not just the boys have beautiful depths of colour – create delicate girly feathers too!
Pheasants ARTbyIMI

Ta Da – This will very soon be up in the Cherry Tree Pub in Rowledge.

Apologies for my lengthy absence – the day job has got BUSY and my Christmas commissions have to remain secret for now!

What if all the good things came true.

An antidote to the negative what ifs that attack us all from time to time.

What if all of the good things came true?

What if you got everything you ever dreamt of?

What if you got that big white studio with the skylights that make it always looks sunny? What if your dog sat beside you in the basket? What if that studio was part of a shop and people were always coming in?
abbey_snr_school_art_studio_full_size

What if big galleries wanted to display your work? What if you got a loyal following? What if people felt happy just by looking at your art? What if your art could bring back good memories? What if your art brought back loved ones?

Refer

What if you got the chance to see more and more beautiful wildlife? What if you got to go on a safari? What if you got to see a kingfisher in real life?

kingfisher ARTbyIMI

What if you went on amazing long walks with your man and your dog? What if you got to crunch through leaves and watch the birds fly? What if people recognised you and were happy to see you? What if you smiled at people and the smile went into your eyes and into your soul? What if they smiled back?

What if bad times led you to places you could never imagine? What if they are just a test? What if they are actually good in disguise?

What if you got to teach incredible people how to paint? What if you inspired people? What if you brought hope back to people? What if you could help other people overcome their problems?

Little brother ARTbyIMI

What if all the good things came true.

That’s my antidote, what’s yours?

A survey – as soon as October hits, suddenly it is Christmas!

I have just found out that I have been allocated a stall at a Christmas Market at Farnham Maltings on the 13th December!
It is great news, but I am wondering what I will be able to sell that close to Christmas.

So PLEASE, put yourself in the punters’ shoes and imagine you are floating round a Christmas market. You have had your mulled wine, you have bought your Christmas tree decorations, and you come across my stall. What next?

Any additional comments and tips you have, please share them in the comments, as I don’t want to invest in stock that won’t sell, and I really want a successful market!


How to paint a beady eye

Pencil in the shape of the eye
Think slightly squashed circle, with a smooth line right the way around. 

pencil eye

Paint in the feathers surrounding the eye using acrylic paint
The feathers close to the eye are often in an outwards direction, so use a little rounded brush to detail this. 

outline eye

Just close to the eye, the feathers will be darker, gradually getting lighter as distance from the eye increases. The feathers above the eye often catches the light, whereas below the eye is slightly more in shade – so alter your colours accordingly.

 Dig out your acrylic inks to create a glossy eye

 *Clue is in the name, these are inks made out of acrylic. They are much more fluid, and give an ink shine when dry, but are waterproof like acrylic paint. You can buy them online or at all art stockists*


Mix up black, white and a hint of blue ink
Create a really deep bluey grey, and paint over the entire eye. Once this is dry, paint in a fairly large oval-shaped pupil in deep black acrylic ink. 

iris eye

Rim two-thirds of the eye in a thin pale grey line
You should be able to control this by using the acrylic inks. Slightly extend the line in the corner nearest to the beak where you would find a tear duct.

Rim eye

Use black ink to rim the remaining third of the eye
This is where you would find the eye lid. Meet this black line at the ‘tear duct’.

Rim blackeye

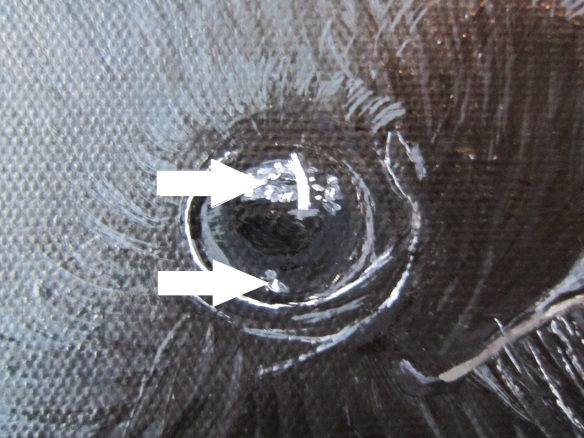
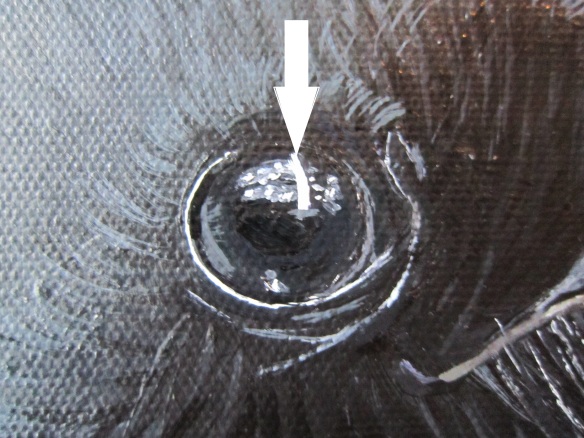
Use a pale grey to create glints of light in the eye
These will be 2/3 up the eye, around the fullest part. Slightly overlapping these with the black pupil. Dab this with your finger to blend slightly.
glint eye

Use a bright white to create a long glint of light at the fullest part of the eye.
This again will slightly overlap your pupil and pale grey blended glints.
 

white glint eye

Ta da!

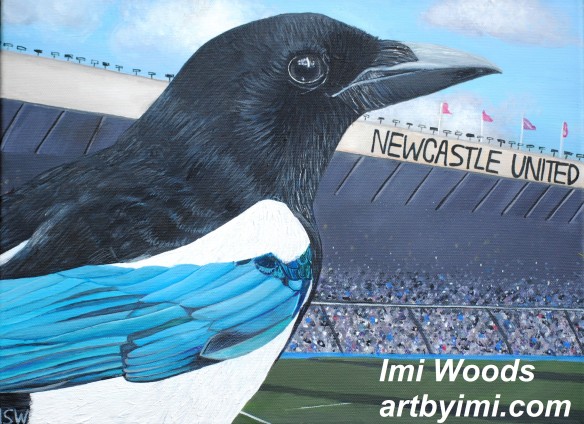
The result should be a beady eye that looks alive! Acrylic inks can also be used on feathers to give them the slightly oily and magnetic appearance that can be seen on birds like magpies and penguins.

Oh and… guess which Football team the owner of the painting supports?!

Magpies


How to paint a short haired cat

I was commissioned to paint Gumdrops the cat for fellow blogger, Kate. I thought it would look really striking on a tall thin canvas, walking proudly, tail in the air.

To Create a painting of a short haired cat, you will need:

  • Acrylic paint
  • Large flat paintbrushes
  • Small rounded brushes
  • Play mat
  • Water
  • Palette (or foil case)
  • Canvas (I used 75cm x 30 cm)
  • Pencil
  • Ruler
  • Photo to copy.

This slideshow requires JavaScript.


Gumdrops was posted off to Gibraltar, and has safely arrived with the proud owner.
I got this lovely email, which just makes my work SO worthwhile!

“I’ve collected Gumdrops the painting and he’s wonderful! .. you’ve really captured his essence .. thank you so much for all the skill, care and attention you’ve put into this lovely painting :)”

Refer


Laugh, Kookaburra, Laugh

Kookaburras are remarkably underrated birds. A more sociable cousin of the Kingfisher, they are full-feathered and expressive – an excellent painting subject.

We met a Laughing Kookaburra at a recent visit to Marwell Zoo. He was incredibly patient and tame, sitting just a metre away from us in an open aviary. He posed for us for a good ten minutes, and we got some really beautiful shots of the Kookaburra and the leafy background in soft focus.

I knew that it would make an amazing statement piece, so I bought a 40 x 60cm canvas and set aside quite a bit of time (I estimate it took 50-60 hours of work) to create Herman the Kookaburra in acrylic paint on canvas.

Why Herman? My sister told me he was a Herman. I wasn’t convinced by the name at all.
I decided to look up the Laughing Kookaburra using the fount of all knowledge, Wikipedia.
What do you know, it was actually founded by someone called Johann Herman.

It was fate, and you can’t argue with fate.

This slideshow requires JavaScript.

If you think your house would benefit from a Herman, please contact me as he is for sale.

Have you ever had a similar experience with fate? 

Time lapse Meercats

Hello everybody!
Lots of busy and exciting things happening recently! I have just put a painting into the Society for Wildlife Art’s annual exhibition, I find out next week if it has been selected. It’s my favourite painting so far, really excited to share it with you soon!

I’ll leave you with Mossy… a painting a did a couple of months ago! I have put it into a handy time-lapse video for you, no scrolling – simples!

This slideshow requires JavaScript.

How to create an Artist’s Portfolio

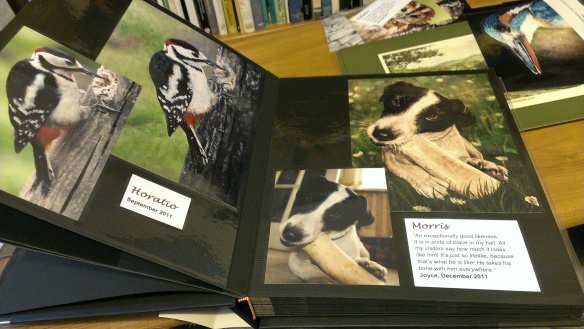
Today I had a display at Gilbert White’s House and Gardens in Hampshire. My portfolio was a great feature, people spent ages flicking through and seeing the extent of my skills. It also sparked several interesting conversations and leads.

In short, a portfolio is the perfect way to show off your skills in an effective and physical way, without relying on computers or the internet to access your gallery.

They can be created simply without too much expense or materials, and yet still look professional!

You will need

  • Large (9×7) photographs of your completed works
  • Small (6×4) photographs of your muse images
  • Printed out titles
  • Printed out testimonials from happy customers
  • A large, plain black self-adhesive photo album
  • Guillotine / ruler & scissors

Step 1: Get your photographs printed. I got mine done at Boots pharmacy, and the good thing is that you can edit the photos on the screen to make them fit to the size of the photograph so that no vital parts are cropped out.

IMAG1102

Step 2: Cut off any white edges using a guillotine for sharp lines. I borrowed one at work in my lunch hour.

Step 3: Set out your photos on the page, without peeling back the self-adhesive layer yet. Give the photographs a slight overlap if necessary.

IMAG1107

Step 4: Work out what remaining space you have on your page to fill with the project title and testimonials. Then chose an appropriate font, text size and layout to fit the surrounding space. Keep the font and size regular for all titles, and all other text, but vary the layout as the space allows.

IMAG1109

Step 5: Cut up the testimonials and titles, again using a guillotine if you can.

Step 6: Choose which order you would like to present the portfolio in. I chose chronological (it seemed logical.)

Step 7: Peel pack the plastic layer to expose the adhesive, leaving it still stuck at the far edge so it can be reapplied easily. Carefully press down your photographs and text in your practiced layout, and then swipe the plastic layer back into place using your forearm to get even pressure.

IMAG1112

Step 8: Wash, rinse, repeat (just without the washing and rinsing.)

A word of caution – although the pages are thick, take extra care that you do not accidently skip a page, because every time you peel back the plastic layer to rearrange pages, the adhesive loses a bit of its stick, and it is a little soul wrenching to have to do it AGAIN.

Ta da, a beautiful coffee table portfolio to show people.
Just take care that no-one walks away with it!

IMAG1115

The time I drew a caricature of my boss and didn’t get fired.

A couple of months ago, I was approached by a man at work about a possible commission.

“I have a potential project for you!”

Great! I am always up for a new project!

“How would you like to do a caricature of <<the big boss>>?”

I went home and saw my boyfriend / official advisor. He had a few words to say about this.

“This can ONLY GO BADLY.”
“Your options are:
a) your boss gets offended because it really does look like him and he can’t take a joke.
b) it’s rubbish and people lose faith in your abilities.”

Quick fact about me: I am notoriously bad at saying no. Instead I whine and worry to people who cannot make any difference.

Obviously I had already said I would try. I can’t let people down!

* * * * * * * * * * * * * * * * * * * * * * * * * * * * * * * * * * * * * * * * * * * * * * * * * * * * * * * 

I started to collect photographs and fun facts about my boss, fed from a private detective…his wife.

“Loves Golf, Dr Who, Percy Pigs, Crystal Palace…

…Can you try to get those into the picture too?”

I said I would try… racking my brains as to why I was making these promises I didn’t know I could keep. With animals I have a track record. This was an unknown.

* * * * * * * * * * * * * * * * * * * * * * * * * * * * * * * * * * * * * * * * * * * * * * * * * * * * * * *

After a week of promising to try… I actually began to try. My plan was to give him the body of a golfer, with an oversized head. That way, I need not risk exaggerating his features! Genius.

boss 1

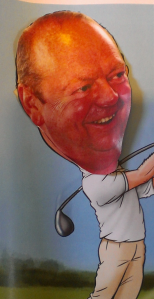
I have remarkably little imagination for someone so arty. I find it very difficult to draw from memory, so I found a photograph of a golfer, mid swing, printed off big boss’ decapitated head, and quite literally stuck it on.


boss 2

As I started to draw my first draft, I completely relaxed! I just sketched it onto a scrap piece of A4 paper in pencil, before developing it with a black felt tip pen. It was looking good!


boss 3

Once the first draft was complete, I scanned it into the computer and printed it out onto an A3 sheet, to scale it up quickly and easily. 


boss 4

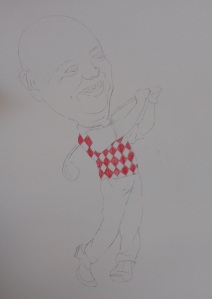
I then re-copied it onto a sheet of card.. I embellished the shirt with stereotypical golfing diamonds, and added a flag in the distance.


boss 5

I got out my colouring pencils and I coloured it in. I didn’t want to risk paint, as you can completely lose your artwork beneath it! I patiently coloured several layers to get the colours lovely and bright.


boss 6

For a few personal touches, I coloured the diamonds on his shirt Crystal Palace red and blue, and the little flag in the background the tasteful company colours of orange and green.


boss 8

Finally I went over the artwork in my felt tip pen, and wrote a personal message on the gold ball “25 years”, his time in the company.


So the moral of the story here is: just because you have never done something, it doesn’t mean you will be rubbish!
You might just get it right.

What have you thought about writing off before even trying it?
Have I convinced you to give it a try?

boss 9

So you want them to actually READ your CV?

I, Imi Woods, Animal Artist, have given myself a metaphorical kick up the backside and decided to start contacting galleries, shops and (gulp) agents.

I looked up “How to write an Artist’s CV” on Google.
It depressed the hell out of me.

“Avoid any formatting at all if possible. No columns, tabs, multiple spaces, words all in caps, quotation marks, or bold formatting. The only formatting needed is italics for exhibition names, article titles and prize names. Stick to one typeface for the entire document. Preferably something simple like Arial or Times Roman. Leave creativity for the art. The CV needs clarity.”

As a self-trained, as yet barely exhibited young Artist… I don’t yet have the facts to speak for me. I have passion, raw talent, beautiful paintings and lots of happy customers… but not the lists of Relevant Education, Exhibitions at the Tate or MoMA, Associations, Publications and Awards that they are really looking for. Sorry, I forgot, I do have the Year 9 Art Prize and I write a blog. I’ll be sure to put that on my CV…

I know that I am going places… I just need a leg up to get on the ladder.

So here are my tips for creating a memorable and interesting CV. The sort of CV that will help the Emerging Artist who doesn’t yet have all the facts to talk for them. It might just get you to the top of the pile… or at least keep you away from the bottom.
Feel free to use ideas from my CV below if you would like.
Please note, this is applicable to other industries too!

print screen of CV

1. Design an interesting layout. Note: a few columns and bullets does not mean interesting. Challenge yourself! Using a table format in Microsoft Word is easy and keeps all of your information in the right place. Keep it clean and functional… but with a bit of pizazz. I put a column going down the left hand side with my name and job title, separated by a block line.

2. Use a bit of colour. I know, not everyone is like me and excited by colours. But one colour as a strong theme running through the CV will draw the eye directly to your CV for the right reasons.

3. Be creative with photographs. This is what is the biggest selling point of my CV. I cut the background out of a photograph of me next to my Artist’s Statement and put it into greyscale. I virtually framed a couple of my paintings too. They are my biggest selling point at the moment, so I see no reason for them not to be put onto my CV. I also cut out the background of a photograph of me painting. I kept the painting in full colour, and greyscaled myself. I guess it says “my art speaks for me”.

4. Do your research about where you are applying to. Angle your CV to bring out qualities that are important to that institution. But don’t fabricate information, tell the facts as they are.

5. Keep your CV focussed. Don’t be a Jack of all trades but a Master of none. I cut out the paragraph detailing my current work on this CV. I feel I have learned a lot in my role as a Submissions Assistant, but can see how galleries would fail to see the relevance.

6. Oh my gosh, proof read your CV! Or get someone else to. Learn how to use that apostrophe correctly. Learn the difference between you’re and your. It’s not that difficult!

7. Show your enthusiasm. I know. Risky.
But right now, my enthusiasm is what is getting me places. People like enthusiastic, friendly people and want to work with them and give them opportunities. On applying for a display space recently in Reading, I was incredibly enthusiastic. Embarassingly so. I was excitable and probably showed my naivety, but received the following as a reply:

“You sound a really enthusiastic and friendly person, just what we need!! Look forward to meeting you soon, oh, and don’t change a thing, you’re fine as you are!”

Wouldn’t you rather buy artwork from someone who loves what they do than someone who is just doing it to pay the bills? I know I would.

*Disclaimer: I don’t know if this will work. Please don’t blame me if you follow my tips and your CV does get put to the bottom of the pile. Maybe galleries and agents are not kindred spirits. Maybe they really do want lists and no formatting. It’s surely worth a shot though, right?

How to paint a King Charles Cavalier Spaniel

You may have spotted him at the Fayre, or you may just be coming across him now. This is Bertie the King Charles Cavalier Spaniel puppy. Judging by his expression, he knows he is royalty. He has a grumpy ‘superior than thou’ expression and gangly legs. Admit it, he is absolutely adorable!

You will need:

  • A lot of time and patience
  • 30cm x 40cm canvas
  • Photograph to copy
  • Large flat paintbrush
  • Range of smaller round paintbrushes
  • Large playmat
  • Water
  • Pencil
  • Ruler
  • Masking tape
  • Acrylic Paint:
    • White
    • Burnt Sienna
    • Burnt Umber
    • Raw Umber
    • Rich Gold
    • Mars Black
    • Cadmium Red

1. Choose your composition: I didn’t have to crop my photograph as it was already a closely cropped image. The customer asked me to keep the background exactly as it was. 
bertie

2. Mark up your canvas. For a 30 x 40 canvas it is easiest to do 5cm2 squares. If you grid out your photo on a screen, make sure that your scaled dimensions are the same. You will probably have to crop parts of your photo and expand it to fill the space.

3. Draw the outline shape of your subject onto the canvas, following the corresponding squares on your screen. For a more detailed way of doing this, see here.

IMAG1033_1_1_

4. Paint the background: The customer wanted the background painted exactly as in the photograph. This was a pink rug and a window. To paint the rug I used various shades of pink and red, and a small round paintbrush to rub the paint in spirals into the canvas. To paint the window, I used a lot of masking tape, a steady hand, and about 50 shades of grey ;-).

5. Begin painting in the beautiful curly ears. This is using a range of rich siennas, raw and burnt umber, gold, flesh tint, etc. Use little round brushes and short curly strokes with a slightly watery paint.

Extend the shades onto the face around the eyes, leaving the nose and a stripe up the forehead in white. Concentrate on the direction of the hairs in the photograph – the top of the ears stick upwards and are paler.

IMAG1057

6. Rim the eyes with a near-black (black mixed with brown or blue or yellow.) Start to paint them in in shades of deep grey to bring out the spherical shape. Put glints in the eyes to bring them to life.

IMAG1064

7.Paint the body in grey. Once you have the grey base you can use paler greys and flesh tint to pick out lighter sections and shadows using a small round brush.

IMAG1068

8. Paint in the nose – make the nostrils a deep black, with a black line up the middle. The rest is a deep grey in a rounded heart shape. Pick out white glints to make it look damp.

Bring out the characteristic downturned mouth. King charles spaniels look grumpy. Really cute, but grumpy. Play on that!
IMAG1073

9. Paint in the collar. If you use metalic paint and a bit of nifty shading, metal rings and disks look very real!

 IMAG1083

10. Decide that following the photograph is a bad idea after all and that limbs appear to be going everywhere! Re-paint the legs by researching other photos where dogs are sitting more nicely! *please note, forward planning and a better photo can eliminate this stage!!

Bertie ARTbyIMI

11. Sniff test of approval?

Bertie and painting